If you’ve ever come face to face with a clogged toilet, you know it can be pretty tense. Watching that water rise quickly and knowing you only have a few minutes or even seconds to react can be extremely stressful. The last thing you want is for the contents of that bowl to overflow onto your floor! If you want to be prepared to come out the winner in this showdown, use these tips to learn how to plunge like a plumber.
You might not realize there are actually two types of plungers:
There’s no use having a plunger if you keep it in the basement or garage. Each bathroom should be equipped with a black plunger to handle clogs quickly to avoid overflows.
As soon as you see that water rising after a flush, you have to act fast. Quickly remove the tank lid and lift the ball float or fill valve. When you do this, you should see the water in the tank stop filling immediately. Next, remove the water line from the overflow tube, or push down on the flapper valve to stop the water in the tank from entering the toilet bowl.
On the wall behind the tank, you will see a valve for the water source. Turn the valve to the right (tighty righty) to turn off the water so there is no chance more water can enter the bowl.
Now that the water is under control, you can get down to the real work. Place the plunger into the toilet bowl, making sure you get a good seal around the toilet drain. This will help ensure you have enough force to dislodge the clog in the u-trap. Holding the plunger with both hands using a rapid up and down motion keeping the seal in place to apply pressure. Soft clogs should release quite quickly while some clogs might be more stubborn and require several plunges.
It is not uncommon for clogs to allow the water to drain but keep some of the solid debris in the bowl. Don’t try to plunge a dry bowl, as not only could this cause a disastrous mess, but also you won’t be able to get a good seal and enough pressure to release the clog. If this is the case, you can turn the water valve back on, turning it to the left. Allow enough water to fill the bowl so you can begin plunging.
There are two possible reasons you aren’t able to remove a clog with the plunger:
If you are unable to dislodge the clog with your plunger, it’s time to call Bragg Home Services Heating & Cooling. We have the tools to assess the situation and take proper steps to fix the problem.
Professionals will use a tool called an auger or “snake” to try to clear the obstruction. The flexible tool can reach down into the pipes safely and force the blockage out of the way. This can be a messy job but can work quite well as the wire can reach as far as 25 feet into the pipes. If this doesn’t work, chances are the clog is further down in the main sewer.
If you have a toilet clog in Novato, CA you can’t remove with a plunger, speak to the experts at Bragg Home Services Heating & Cooling today.
If you notice your toilet isn’t flushing properly, it could be a tank issue. Lift the lid (if it’s accessible) of your toilet tank and take a look inside. This tank runs clean water, which helps your toilet flush. If the tank is empty, there could be a problem.
At Bragg Home Services Heating & Cooling we specialize in home and business plumbing across Novato. Working closely with local families, we’ve come to know a thing or two about empty toilet tanks and how to fix them.
Generally, if you notice an empty tank, it means one of three things:
Here, we’ll talk a bit about why your toilet tank might be empty and how it can be fixed.
The fill valve in your toilet controls how much water comes into your tank after you flush and use the reserves. The fill valve gets a workout over time and can slip out of place. If your valve isn’t sitting right in the tank, you can readjust it to manage water levels.
Adjusting the fill valve is something you can do yourself or call a plumber for help. If you move the valve yourself, follow these steps:
Never force anything that doesn’t want to move in your toilet. If you try to turn the screw and it’s stuck, it’s best to call a professional for help. Forcing the screw could damage the adjustment rod. If you break the rod, you’ll be out a part and need to have it replaced to flush your toilet properly.
If your toilet is older, it likely has an object called a float ball inside. As the name implies, this little ball floats on the top of the water in your tank. It tells your toilet tank how high the water should fill. If the float ball is too low in the tank, your water level will reflect this.
Like the fill valve, you can manually fix the position of your float ball without a professional. To do so, follow these steps:
Flush the toilet and watch the ball position if it resumes its low level in the tank, it might need to be replaced. An old float ball isn’t a huge problem, but it does mean a trip to the hardware store or a call to your local plumber. In Novato you shouldn’t have a problem locating a float ball, but if you do, we can help.
The handle you use to flush your toilet from the outside of the tank is connected to a trip lever inside. If the internal trip level isn’t working, the toilet won’t flush, and the tank won’t fill. Unfortunately, most trip lever problems require a new lever.
To see if the lever is the issue, remove the lid of your toilet tank and look inside. The lever is near the handle, inside the tank. It commonly looks like a long metal rod, bent to resemble a lever. This is connected to the flush valve.
Flush the toilet with the tank lid off and watch the trip lever. If the lever doesn’t move, isn’t connected to the valve, or moves but the toilet still doesn’t flush, it could require some fixing. Trip assembly is delicate, and if it’s not positioned properly, it could be the difference between a flushing toilet and a broken one.
At Bragg Home Services Heating & Cooling, we don’t recommend you try to fix a broken trip lever by yourself. The biggest issue is that the trip lever connects so many other parts of your flushing mechanism. If you damage something else in the process it could mean spending more time and money on the resolution.
If you’re experiencing problems with your toilet tank and you live in Novato, Bragg Home Services Heating & Cooling is on the job. We work with homeowners and businesses across the city and are happy to help. Contact us today to be in touch to a member of our team and to learn more about how we can help.
Before the winter season arrives, it’s important to prepare your home for the cold months ahead, particularly your plumbing system. As temperatures drop and pipes begin to chill, there is a growing risk that expanding ice could burst your pipes and flood your home. At Bragg Home Services Heating & Cooling we work with clients across Novato, ensuring homes are ready for the cold snap. If you want to learn more about how you can prevent leaks and plumbing damage follow along with our winter plumbing maintenance checklist.During the winter season, a nice hot shower is a perfect cure to a long cold day. There’s nothing worse than when you go to take that shower and find the water is cold. Tankless water heaters are meant to heat water quickly, so you don’t face issues like running out of hot water. What does it mean if your tankless system doesn’t get hot?
At Bragg Cooling, Heating & Plumbing, we get questions about winterizing tankless water heaters a lot. Here, we’ll share some information on why your water heater may not be working properly, and how you can fix it.
There are many ways to tell your tankless water heater isn’t working the way it should, or that your pipes have frozen, including:
If your tankless water heater isn’t warming water, don’t try and force it. Your pipes may need to thaw before you can safely use the system. We recommend speaking with a plumber about thawing pipes.
If it’s not a pipe problem, and strictly a tankless water heater problem, call your heating and cooling or plumbing experts to have somebody come take a look at the heater. There may be a reason, aside from winter frost, that keeps the tankless heater from operating the way it should. It’s always better to let a professional deal with your heater when possible to avoid breaking the system.
Extreme cold temperatures can cause problems for pipes and water heaters. A problem area for this type of weather is during the night when homeowners turn the heat down and aren’t regularly running water.
Tanks are also prone to freezing if the power goes out, or if you leave your home on an extended vacation.
For cabins and rental properties, especially, winterizing your tankless water heater is important. Many seasonal properties don’t see as many visits during the cold winter season. This leaves your pipes and heater to freeze while heat is off and plumbing isn’t being regularly used.
If you’re nervous about losing power or experiencing an icy winter night, you may want to invest in solenoid valves, which protect your tank from freezing. The valves work by draining the water from your tank if it loses power.
Whether you’re going to be away for a particularly cold weekend, or your rental property doesn’t have a winter tenant this year, you can winterize your tankless heater to prevent it from freezing.
Your Pipes and plumbing may also freeze when temperatures drop so low that tankless heaters stop running. To protect your plumbing, you can wrap pipes with insulation or heating cable. Heating cable is a particularly affordable option and protects up to minus 50 degrees Celsius.
If you’re unsure about how to protect or wrap external pipes, we recommend contacting a plumber for help.
Bragg Cooling, Heating & Plumbing is a leading provider of tankless water installation here in Harrisonburg and the surrounding areas. Want to know more about Bragg Cooling, Heating & Plumbing and our water heater services? Give us a call today to speak to a member of the team. We’re always happy to hear from new and returning customers.
When a cold winter’s night is approaching, it is a wise idea to consider if you should do something to prevent your pipes from freezing. While you might go many winters without getting a frozen pipe, a single burst will be enough to make you cautious every winter after. Pipe bursts from freezing are major hassles that can cause serious water damage to your home, even to structural components.
They can cause mold, damage things like your furnace and do plenty of damage. They can also wrack up quite the water bill, along with the bills to repair and replace the pipe and everything it has damaged. At the start of every winter and before the worst record-breaking cold nights, you should consider if you need to do anything to prevent your pipes from freezing. Here are the steps that you can take to prevent pipe freezing.
Just like walls, pipes can be insulated. Hardware stores sell insulation specifically for pipes, don’t try to put wall insulation on them. Also, you may not necessarily need to insulate every pipe in your home. Steel and copper pipes will be more vulnerable to cold temperatures than plastic ones because metal is a better heat conductor. When you insulate these pipes, you may also find that this solves condensation issues too.
Heat tape is another option to keep your pipes from freezing. This can be a safety risk, so you should read the instructions for heat tape carefully and only use them where and how the manufacturers recommend it. Some tape is meant only for outdoor pipes and some only for indoor pipes.
Especially if the home is vacant, you should turn up the heat during winter nights. Excess heat can help protect the pipes from freezing and it can be protective of other features, appliances and surfaces in the home too, which are all likely not meant to be frozen.
Cracks and gaps in the foundation can let in cold air even though the home is warm. These gaps and cracks are especially a problem if they are right next to pipes, as this will expose the pipes to the coldest air and increase the odds that they will freeze over. You can fill in these gaps and cracks before the cold weather arrives. Ideally, you’d have a professional do this to ensure that the crack is filled for the long-term, or you’ll find yourself out there next winter filling in the same gaps.
The outdoor fixtures are more likely to burst than the indoor ones, simply because they are exposed to colder temperatures and aren’t protected by the house. It is a good idea to disconnect the outdoor hoses and drain water from the pipes that lead to outdoor hoses. Though these are internal pipes they will also be colder than the other indoor pipes because they lead outside.
If all else fails, and a very cold night is approaching, then you can run the faucets a little. Just a small trickle for every faucet will keep the water moving, which helps prevent it from freezing. Moving water needs much lower temperatures to freeze than standing water, although it is still possible for them to freeze. And don’t forget to turn off all the taps in the morning.
Well, worse has come to worst and you’re certain you have a frozen pipe. What steps should you take to prevent additional damage? Of course, you should call a professional plumber right away, to get them on the road to you as soon as possible. You should then take the following steps:
Do you need help preparing your home for the next big freeze? Or, are you worried that you are dealing with a frozen pipe problem already? Reach out to us at Bragg Home Services Heating & Cooling. We can help you minimize the damage to your home and recover quickly.
When it’s time to eat and you walk into the kitchen, it is awfully unappetizing to be greeted by a bad smell from the garbage disposal. How can you remove this smell for your own comfort, or quickly before guests arrive? In this step-by-step guide, we’ll show you how to get rid of the gross smell from your garbage disposal. Plus, we will show you how you can avoid making this unpleasant odor in the future.
Here are the tools and materials you can use to clean out your garbage disposal. They might not all be necessary, depending on what kind of clean you want to give the disposal. So, give the instructions a read before you gather all of this up:
When cleaning out the garbage disposal, it’s always a good idea to turn it off and unplug it. You don’t want to just turn it off because you could accidentally flip the switch. Or, more likely, a child or pet could. You don’t want to have your fingers anywhere near the blades when the garbage disposal could turn on.
Start with your sponge and work up a lather on it. Scrub all of the parts of the garbage disposal that you can see, including the flange and where it meets the sink basin. Any foodstuffs that are stuck here, even microscopic ones, are exposed to water all the time and are likely to rot and grow mold. This could be the cause of the smell.
When you run the garbage disposal, water passes through it and could leave behind food bits everywhere. These could also be the source of your smell. There is a quick way to rinse them all out, with the added benefit of the scrubbing power of vinegar.
Plug your sink and fill it with warm water, about three-quarters of the way. While it runs, add dish soap to make some bubbles. You can also add up to half parts vinegar to help clean things out. Make a point of ensuring the sink isn’t full all of the way, or what you’re about to do next will be messy.
Plug the garbage disposal back in. Unplug the sink and then turn the garbage disposal on. The water will run into it and be propelled through the housing by the moving blades. It may sputter up a bit and should do a good job of cleaning out the far corners of the disposal.
Did that not quite do the trick? You can follow the water flush with something a little more serious. First, place your ice into the garbage disposal. Salt running it, and then begin to pour in about a half cup of kosher salt. The salt abrasive and the ice helps it make an impact, without risking making a clog in the garbage disposal, as it will melt.
You have almost certainly removed whatever cause the smell. But, the molecules will still linger in the air for a little while. What should you do to get rid of the smell in the short term? You can run lemons or another citrus in the garbage disposal to make a more pleasant smell. Or you can try to absorb the smell with baking soda or a deodorizing cleaning spray (like Febreze). If you don’t have any of those, you could also light a candle in the kitchen and use that scent to mask the remaining smell.
While you can do major cleans like this to handle smells that develop in the disposal, it is probably more convenient to just follow a few simple tips to keep the disposal smelling good all of the time. Here’s what you can do:
Do you have other garbage disposal woes? If you live in Novato, CA, you can call us at Bragg Home Services Heating & Cooling. We’re happy to help answer your questions and keep your garbage disposal running smoothly.
How can an appliance that is supposed to be so convenient be so frustrating? That’s probably what our clients in Novato are thinking when they call us because their dishwasher isn’t draining. If you’ve already taken the step of running your dishwasher a second time, just in case it got cut off during the drain cycle, and you still have the problem, then you probably need a professional’s help.
Don’t believe the internet hype about putting vinegar and baking soda into the dishwasher. For most problems, this won’t help at all, and when there is a clog there are cleaner, better ways to remove it. Here’s what could actually help your dishwasher drain properly.
Your dishwasher drains out through the same pipe that your garbage disposal is in. So, if you’ve been putting starch and fats down there, or not cleaning food out from it properly, then you may have created a complete or partial clog in the drain. Then, the water from the dishwasher can only drain out very slowly, or not at all. To fix this one, you need to empty out the clog or partial clog. This can be as simple as running the disposal. Or, you may need a plumber to come in and get rid of a clop in the trap.
Once the disposal is clear, refamiliarize yourself with what you can put down the disposal and how to clear it out afterwards. Start running it for 15 extra seconds and then flush it with some hot water.
Here are foods that you should avoid putting down the garbage disposal:
Also, if it turns out that the clog was actually in the dishwasher drain line, you may want to redouble your efforts to rinse dishes and remove food bits before you place them in the dishwasher. It cannot handle the same volume or types of food that a garbage disposal can.
If you don’t have a garbage disposal in your sink to create a clog, then you do have an air gap. It is created by a small steel cylinder placed inside the sink right near the faucet. The whole idea is to prevent clogs by preventing airlocks. On the other hand, the airlock itself sometimes gets clogged with debris from the sink and creates a clog of its own.
Fixing this one is relatively simple. You take out the air gap. Look for debris and wash it out. You can use a brush or just a spray of water (from another sink) will work.
If you’ve exhausted the above options, then it is most likely that some part of your dishwasher is the problem. While you can attempt DIY repairs on these parts, it’s more likely that you’re going to need a plumber. Here are some of the possibilities:
If you’re in Novato and your dishwasher isn’t draining, then you can call us at Bragg Cooling, Heating & Plumbing to help solve the problem properly.
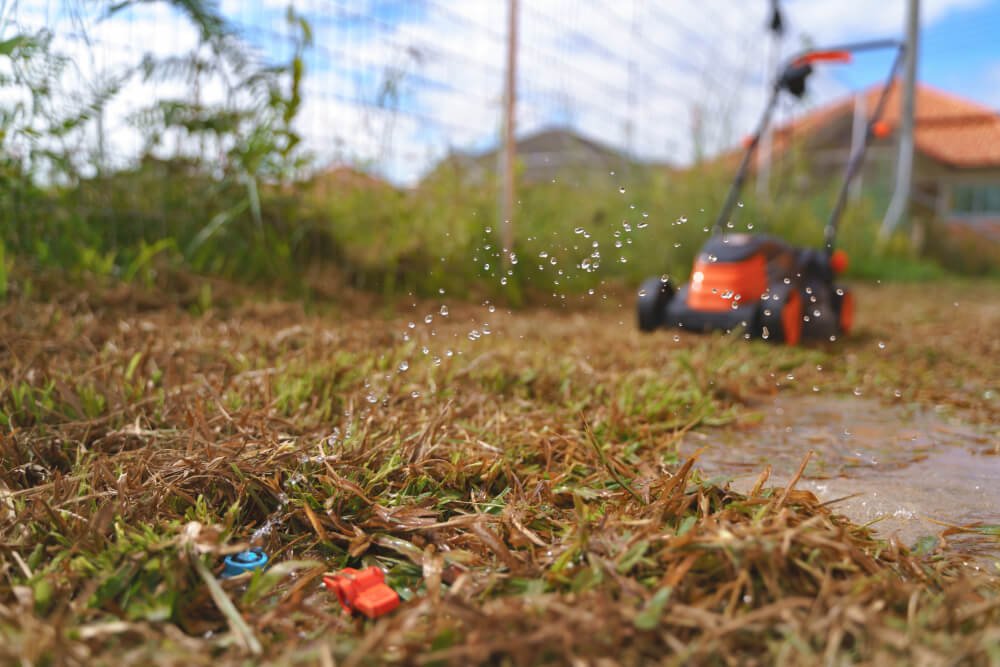
Nothing is more disturbing than stepping out onto your lush green lawn to find yourself standing ankle-deep in water. When this occurs it is a sure sign something is wrong with your plumbing. Here are some of the reasons your yard might be soggy and what to do about it.
First things first, you need to find the source of the leak. This is easy if you look around and see water bubbling up in the lawn. If you can’t spot the spray, try these tips:
If you try all of these things, and still aren’t sure what is causing the leak, it’s time to call your Novato plumbing experts at Bragg Home Services Heating & Cooling. They can assess the situation to determine if it is sewer, main line or sprinkler related.
While a soggy yard is easy to spot, there are some underlying hints that might not be as easy to spot indicating you could have a leak with your sewer or main line. If you notice any of the following, it’s time to call the team at Bragg Home Services Heating & Cooling:
All of these signs combined are a sure sign you have an impending yard leak.
Damage to main pipes is the main cause of yard leaks. Damage can occur for many reasons, from normal aging to tree roots and damage from digging to your property settling. These things can lead to breaks in your main water line, sewer line or sprinkler system. Since all of these main pipes and water sourcing runs underground when the pipes are damaged the water slowly seeps out and soaks your lawn.
As soon as you spot a soggy lawn or any of the other signs above, you’ll need to call Bragg Home Services Heating & Cooling in Novato. They will know exactly what to do and will find out why your lawn is soggy and correct it.
Many home buyers are drawn to shady streets with mature trees that add a lovely touch to the property and neighborhood. As lovely, and eco-friendly as they might be, trees can also wreak havoc with your property. One of the biggest threats is tree roots which can cause serious, costly damage to underground pipes. While it might seem impossible for a tree to break sewer lines, the larger the tree the more intrusive the roots. This increases the risk for pipe damage.
Trees depend on their roots to provide life-giving water and nutrients that keep them alive. As trees mature, the root systems become quite complicated, spanning a large area. Not only do they spread, but they also grow as they have to support the growth and height of the trunk and branches above. All you see is a lovely, green, and shady tree, but what lies below is not just the tree’s roots, but the sewer lines servicing your home.
Tree roots can sense the water and oxygen coming from pipes. Since they need this to survive, they will create a path leading to the pipes. If there is a cracked pipe, the roots are even more likely to seek out the pipe’s location. Once the roots reach the pipe, they will break in through the crack. As the tree grows, the roots grow, causing more and more damage. It is not just cracked pipes that roots can damage. The force of the roots can break through pipes in good condition, causing just as much damage.
Once a root enters the sewer line it leads to many issues. Not only will growth continue to crack and open the pipe, but it will also grow into the pipe leading to blockage. This is a scary thought because everything is happening underground, so you won’t know something is wrong until it becomes serious. As a result, the roots continue to grow eventually causing complete collapse of the pipe.
If you do have trees on your property, you should be on the lookout for signs they have broken your sewer line. An early red flag is if gargling toilers or foul smells coming from clean sinks and toilets. The sooner you speak to your Novato plumbing experts at Bragg Home Services Heating & Cooling, the sooner you can confirm you have root damage. As things become more serious you might also notice the following issues:
All of these signs indicate your sewer lines are damaged and require immediate attention.
Speaking to a reputable Novato plumbing team is the first step. You want a company offering video inspection services as this is the best way to quickly discover root damage. They can pinpoint where the issue lies and how much damage has occurred. When tree roots are the problem, depending on the extent of the damage, sewer line replacement using root-resistant materials might be recommended. The roots will have to be removed and then measures taken to control the roots from causing further damage.
In some cases, it might require re-routing of the sewer line, or using herbicides to control growth. Steps to clear blockages include using special equipment to break down the roots such as drill and rodding machines and then doing a final blast using hydro-jetting equipment to wash away the debris. Once this is done, we will have a better idea of how much damage the roots have caused and make recommendations on the repairs or replacements required.
There are a few ways to reduce the risk for broken sewer lines including:
These steps allow you to take a more proactive approach to property care which in turn reduces risk for sewer line damage.
Tankless water heaters can be an excellent option to provide ample hot water for your household while creating a more energy-efficient home. Here are the pros and cons of a tankless water heater to help you decide it is the right solution for you.
Instant hot water: Once the cold water sitting in your pipes is flushed out when you turn on the hot water tap, you instantly get a stream of hot water.
Longer lifespan: Generally tankless units can last up to 20 years with proper maintenance where a standard, high-quality water heater lasts about 10.
Reduced monthly costs: Tankless water heaters are more expensive at the time of installation, but they save money in the long term as they are far more energy-efficient. This translates into continued savings over time, so you more than make up your slightly higher upfront investment costs over time.
Less space: Tankless units are smaller, so they take up less space than your standard bulky storage models. This frees up space in your home for storage, an especially attractive pro for small homes.
Potential tax breaks: In some areas, you can find tax credits because the tankless water heater is so energy efficient. The federal government also offers a 10% tax credit when you buy and install a tankless unit.
No “Standby Loss”: Standby loss is the loss of energy used to keep the water heated in a storage unit. You eliminate this cost because the water is heated as it is used.
A steady stream of hot water: As long as people use hot water consecutively instead of all at the same time you can enjoy a steady stream of hot water as you aren’t depending on a reserve of hot water that will eventually run out.
Choose between electric or gas models: You can choose between electric or natural gas-powered models depending on your local infrastructure. This allows you to save money as you don’t require costly gas line rerouting.
Longer warranties: Because tankless units have a longer life expectancy, they also have longer warranties that often last as long as the water heater.
Temperature inconsistency: It is possible to experience temperature inconsistencies with tankless water heaters when the multiple outlets are on at the same time. Just be sure people take turns and you time things right.
Water supply: Tankless units don’t have a limitless supply of hot water although they do provide a steady stream. As with above, you can experience low supply when more than one person is trying to use hot water at once.
Upfront investment: As mentioned in the pros, you will pay a higher initial cost at the time you install your tankless water heater. This is a consideration if you feel coming up with $1,000 in hand with labor costs can pose a problem. You will make the money back over time, but if cash flow (or available credit) is a problem, this unit might not be an option.
Additional equipment: In some cases, you might find you need a water softener to optimize your tankless water heater’s performance. This can add to the above-mentioned costs and even eat into the space savings we mentioned as a pro. Together the two appliances could take up more than a traditional water heater, so if cost and space savings are your motivation for a tankless unit, then a standard storage unit might be best.
Additional labor: Due to their non-traditional set up you might find your installation requires your gas line to be rerouted. This is one of the reasons you pay more upfront for a tankless unit. New vents might also be required. Remember you can choose an electric model to avoid the additional labor costs.
Possible ROI issues: While you will see the money invested in your tankless unit be paid back, sometimes your ROI is not as good as you hoped. Although ultimately you will come out ahead, it could take as long as six to 12 years to see those month over month savings add up enough to cover those additional upfront costs.
If you have a smaller space, smaller household or want to enjoy a steady stream of hot water, a tankless water heater could be the ideal solution for you. Speak to your Novato water heater experts at Bragg Cooling, Heating & Plumbing today for more information on the benefits of a tankless water heater.